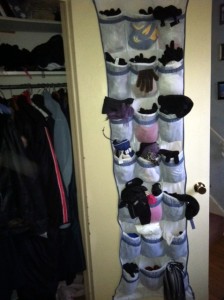
We live in Buffalo. Insert your own joke about snow here. Therefore we have a lot of hats, mittens, gloves, scarves and other cold weather paraphernalia that floats around. For years we stuffed all of this in the hope chest in our front hall. It was a disaster. Nothing stayed together. And people always piled stuff on top of the chest, so we could never get in it! I tried keeping all of this winter weather stuff on a shelf in the coat closet. This was an even worse idea. Nothing stayed on the shelf and no one could see or reach anything.

My solution? A fabric mesh shoe organizer. I attached it to the inside of our coat closet door. Each pocket nicely holds together pairs of mittens/gloves and keeps hats and scarves easy to find. It’s also nice because you can assign each person their own row/column, so there’s no mixing up of belongings, making it a lot easier to find that pair of gloves you want when you’re heading out the door.

We live in Buffalo. Insert your own joke about snow here. Therefore we have a lot of hats, mittens, gloves, scarves and other cold weather paraphernalia that floats around. For years we stuffed all of this in the hope chest in our front hall. It was a disaster. Nothing stayed together. And people always piled … Read more

Before #1

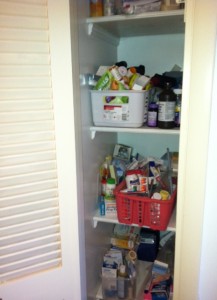
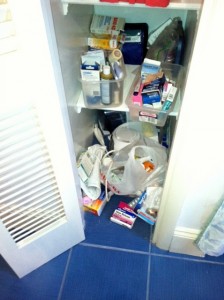
I’ve won one storage battle. The kids’ bathroom has a little narrow closet I use to store medications and supplements, as well as first aid supplies and any potion or lotion you can name. I’m a bit of a hoarder when it comes to this stuff. While I do regularly purge and toss expired prescriptions, I have managed to gather a pretty large A to Z collection of vitamins and supplements as well as OTC meds. The ones that are taken regularly live in a drawer in the kitchen. The rest were in this closet. Yes, it was ugly. I am loathe to throw them out since we seem to cycle back through ailments pretty regularly. However, even though I KNOW I have, say, ginger, or stinging nettle, I’m usually damned if I can actually find it when needed. I’ve been saying for a long time that what I need is a supplement library, where I could store everything alphabetically, so that I could find it when I need it.

It occurred to me that although this closet is tiny, the
before #2

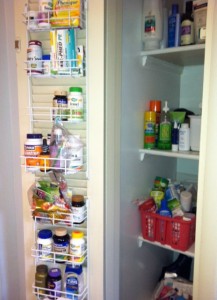
shelves are set in pretty far and there is room to put shelves on the backs of the doors. Genius moment. I Googled to find shelving.  Here is what I  ordered from DrawerSlides.com. It was hard to find shelving narrow enough for this tiny door, so these were a bit pricey. We ordered three of them so we could outfit the door from top to bottom.

We installed the shelving (simple job with a power drill) and I got to work. First it was time for another purge, so I sorted through everything and filled a garbage bag. Next I organized supplements and OTCs that we would be mostly likely to use on the door. This was a challenge since some of the shelves were not very wide. I had only three shelves that would hold big bottles.

I organized it in roughly alphabetical order so I can find things. The shelves are so narrow that there is just one row per shelf, so there’s no chance of anything getting lost. Then I organized what was didn’t fit on the door. Prescription meds went into one plastic bin. OTCs went in another. Big bottles stood on shelves. First aid supplies went into two smaller plastic boxes.
After

I also tackled the job of the top shelf of this closet which holds extra shampoo (people and dog!) as well as sunscreen and bug spray. I tossed a lot of almost empty bottles and used a plastic shoebox to put all the sunscreen together in one place so I can just pull it out instead of rummaging in the closet for it.

Total time for this project: about an hour. Total cost: $90

Satisfaction level: Priceless!

I’m so happy with how this worked out that I’m ordering more of this shelving to put inside a similar closet in the master bath.

Check your house for backs of doors where you can add some extra storage. I’ve done this in my pantry. The doors under your kitchen and bathroom sinks are usually a good spot to add some extra storage if you don’t have a closet like this!

I’ve won one storage battle. The kids’ bathroom has a little narrow closet I use to store medications and supplements, as well as first aid supplies and any potion or lotion you can name. I’m a bit of a hoarder when it comes to this stuff. While I do regularly purge and toss expired prescriptions, … Read more

So, ok, I do buy jarred spaghetti sauce (which horrifies my Italian cousin-in-law). Sometimes I make my own (usually in summer when I have an abundance of tomatoes), but often I just buy a jar. I buy my store brand for 99 cents a jar. And it’s good. Really good. But I admit I was swayed when I saw Mario Batali was selling his own. And somebody (Real Simple?) declared it the best jarred sauce. And my mom started buying and liking it. So I tried it.

First problem. One jar = $6.99 (yes $6 more per jar than the store brand). I am all for paying for quality, but that’s ridiculous.

I opened the jar and poured it in a bowl. It was really thin.

We ate it with ravioli for dinner one night. No one liked it. At all. It was very acidic and had no natural sweetness to it. It didn’t have a lot of flavor. Comments included “this takes like canned tomato soup” “I can’t eat this” and “Why is this so bad?”

Sorry Mario. It wasn’t a winner at my house. We’ll stick with our store brand for now.

So, ok, I do buy jarred spaghetti sauce (which horrifies my Italian cousin-in-law). Sometimes I make my own (usually in summer when I have an abundance of tomatoes), but often I just buy a jar. I buy my store brand for 99 cents a jar. And it’s good. Really good. But I admit I was … Read more

Getting your pantry/food storage organized can be a challenge. Sometimes it’s just a matter of purging and moving things around. But honestly, for most of us, it’s about making better use of the space. And that means you need to invest in a couple of inexpensive products to make it easier to see and store things. Here are my favorites:

  • Under-shelf racks. These essentially add another shelf and it’s much better than stacking things, trying to balance them and having them tumble all over the place.
  • Wall or door-mounted shelves. These allow you to use space you didn’t even know you have. Use spice rack size for small items and wider shelves if you want to store canned goods.
  • An elevator. A graduated stepped shelf that you set on an existing shelf allows you to finally see what’s behind everything! You’ll no longer buy duplicates of black beans and tomato paste because you’ll finally be able to see what you own.
  • Plastic shoeboxes. I love these to store bulk bags of spices I buy from Penzey’s, to keep all the individual size canned fruit packages from rolling around, and for tea and drink mixes. I also use one for my collection of sea salts. They’re easy to take in and out and keep all those little things organized.
  • Square glass storage jars. These are my pick for storing baking goods, cereal, pasta, and other products. Because they’re square, they stack and fit together. Glass contains no harmful chemicals and they are see through, so you know exactly how much you have left.

The glass jars are the most expensive items on the list. You can get everything else for $50 or less. I suggest gradually replacing your plastic with glass over time. You can find many of these are discount stores like Walmart or Target. Amazon is a great online source. The Container Store also have a lot, but their prices tend to be a bit higher.

Getting your pantry/food storage organized can be a challenge. Sometimes it’s just a matter of purging and moving things around. But honestly, for most of us, it’s about making better use of the space. And that means you need to invest in a couple of inexpensive products to make it easier to see and store … Read more

I’ve been bit hard by the New Year organizing bug and the kitchen was what was begging for attention this past weekend. I happen to have written a kitchen organizing book, so I have a little bit of experience in this area!

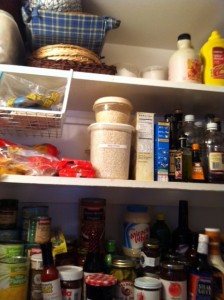
The pantry is the hardest place in my house to keep orderly. We have a pantry that is built over the basement steps, so it’s like a closet, but you have to go up a step to get in it. It’s filled with shelves and racks and baskets, as well as some risers to make cans easier to see.

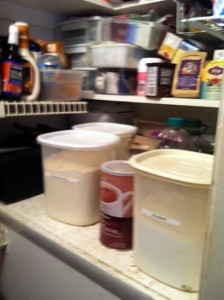
The big problem was that this past year I became gluten-free, taking my family along with me (mostly). But I still had big tubs of flour (white flour, whole wheat flour, white whole wheat flour, rye flour, self-rising flour, bread flour, and cake flour) that were crowding my pantry, while my gluten-free flours were floating around in plastic bags. It was time to take action. Out went all the flour with gluten (except for one bin of all-purpose to use for school bake sales, etc.). I washed the containers and filled them with my new gluten-free products. I had enough containers left over to finally put some items (like gluten-free oats,  cornmeal, gluten-free breadcrumbs, and different rices) into their own storage containers.

Not only have I written the book on kitchen organizing, but I also unofficially apprenticed myself to Martha Stewart for several years (this blog used to be called MarthaAndMe). And Martha is the queen of organization. So I took a page out of Martha’s book and used my little P-touch machine (which prints labels) to label each and every container in my pantry, on the lid and on the side. So now I can tell exactly what is in each without fumbling around and trying to read my handwriting on the lids. It’s genius.

I kept some regular pasta, which the kids promise to use up on their own, but I separated it out so now I have a gluten-free and a regular section.

I made a bag for the food pantry with soups and other products that were unopened and contained gluten.

I still would like to switch everything over to glass storage containers instead of plastic, so that remains on my long-term wishlist for the pantry.

What condition is your pantry in?

I’ve been bit hard by the New Year organizing bug and the kitchen was what was begging for attention this past weekend. I happen to have written a kitchen organizing book, so I have a little bit of experience in this area! The pantry is the hardest place in my house to keep orderly. We … Read more

I recently wrote about my top ten travel food experiences. Food is such an important part of travel for me. What have you eaten on your travels that was memorable?

I recently wrote about my top ten travel food experiences. Food is such an important part of travel for me. What have you eaten on your travels that was memorable?

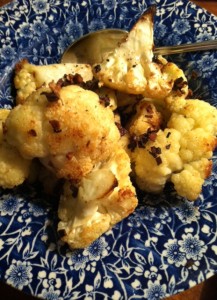
I found this recipe in The Gluten-Free Table, by Emeril Lagasse’s daughters (see my review here). It packed a TON of flavor. I totally loved it!

Cut up one head of cauliflower and arrange in a baking dish. Preheat oven to 450. Melt 4 tbsp butter and 1 big clove of garlic, minced, in the microwave, then pour it over the cauliflower. Season with salt and pepper. Roast 20-25 minutes.

Bam. It was crunchy. It was flavorful. It was not boring. I am in love.

I found this recipe in The Gluten-Free Table, by Emeril Lagasse’s daughters (see my review here). It packed a TON of flavor. I totally loved it! Cut up one head of cauliflower and arrange in a baking dish. Preheat oven to 450. Melt 4 tbsp butter and 1 big clove of garlic, minced, in the … Read more

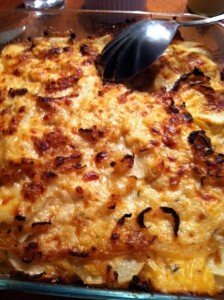
You can thank Paula Deen for this recipe, which I found in the Jan/Feb issue of her magazine. This is one of the lighter recipes the magazine is now featuring. I made half a batch of this and it was more than enough for my family of 4 (lots of leftovers). I really liked the flavor of the onions in this dish and it was nice and creamy. Caramelizing the onions is the time-consuming part of this. I made twice what I needed and froze the rest – they will be a great way to dress up my veggies or to use in other recipes in the coming week.

There is one flaw in this recipe – it lists Pecorino Romano cheese, but there is nowhere in the instructions where it says to add it! So I put mine on top (shrug). The recipe calls for low-fat evaporated milk, but I could only find fat free, so I used that.

1 tbsp flour

2 lbs sweet onions, sliced

1/3 cup flour

1 12 oz can light evaporated milk

1 cup chicken broth

1/2 tsp black pepper

1/2 tsp salt

2 tbsp thyme

5 lbs russet potatoes, peeled and sliced 1/8 inch thick

1/2 cup grated Pecorino Romano cheese

Preheat oven to 350. Spray a 13×9 baking dish with cooking spray.

In a large skillet, melt the butter over medium. Add the onions and cook, stirring occasionally for an hour or until golden brown.

In a small bowl, whisk flour with 1/2 cup of the milk. In a saucepan, combine the rest of the milk, chicken broth, pepper,and salt. Bring to a boil over medium high heat. Whisk in the milk/flour mixture and reduce heat to medium, whisking for 5 minutes or until thick. Stir in thyme.

Arrange 1/4 of the potatoes on bottom of pan. Top with 1/4 of the milk and 1/4 of the onions. Repeat 3 times. Cover with foil.

Bake for 30 minutes, then remove foil and bake another 45 minutes.

It turned out perfectly and fed us for a second meal as leftovers.

You can thank Paula Deen for this recipe, which I found in the Jan/Feb issue of her magazine. This is one of the lighter recipes the magazine is now featuring. I made half a batch of this and it was more than enough for my family of 4 (lots of leftovers). I really liked the … Read more

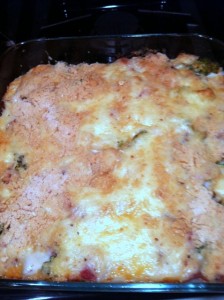
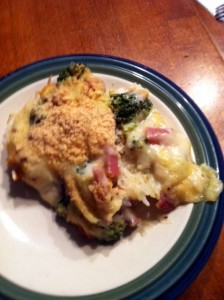
I make ham twice a year. Christmas Eve and Easter. I’m not sure why, except it’s kind of a novelty, smells good, and it does taste great, especially when I baste with pineapple juice and make a brown sugar and Dijon mustard coating! But the end result is I have tons of ham haunting me afterwards. I took the bull by the horns and whipped up this awesome casserole. It was so good I would buy deli ham just to make it again.

Ham, Rice and Broccoli Casserole

4 tbsp butter

1/4 cup flour (I used gluten-free)

2 cups skim milk

1 tsp Dijon mustard

salt and pepper

2 1/4 cups hot rice (if you use leftover rice, heat it in the microwave)

2 cups broccoli florets (I used raw, but if you have leftover cooked broccoli, you can use that)

1 1/2 cups diced ham

1/2 cup shredded Swiss cheese

2 tbsp breadcrumbs (I used gluten-free)


Preheat the oven to 350 and spray a 9×9 square inch baking dish with cooking spray. Melt the butter in a saucepan and stir in the flour, cooking it for about 30 seconds. Whisk in the milk and mustard and salt and pepper to your taste, and whisk occasionally as it thickens over medium low heat. (Note that you can make this sauce in advance, but be sure to heat it up before you pour it on your casserole.)

Meanwhile, spread the rice on the bottom of the dish. Top with the broccoli, then with the ham. Once the sauce is thick, pour it on top. Sprinkle with the cheese. Top with the breadcrumbs. Cover with foil and bake for 20 minutes. Uncover and bake another 25 minutes until bubbly and browning on the top.

Oh my. This was creamy and comforting and I felt oh so virtuous for using up my leftovers. Everyone loved this, so this is definitely going to be my go-to dish to use up ham from now on!

I make ham twice a year. Christmas Eve and Easter. I’m not sure why, except it’s kind of a novelty, smells good, and it does taste great, especially when I baste with pineapple juice and make a brown sugar and Dijon mustard coating! But the end result is I have tons of ham haunting me … Read more

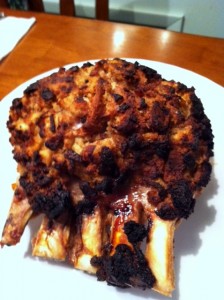
Did I get you with “apple and bacon?” Oh yeah. This was really yummy and it smelled so great while it was cooking!

Apple and Bacon Stuffed Pork Roast

4 slices bacon, diced

1 small onion, diced

1 stalk celery, diced

1 garlic clove, chopped

1 apple, peeled, cored and diced

salt and pepper

4 slices sandwich bread, in small pieces (I used gluten-free)

1/2 cup (or more) chicken broth

2 sweet potatoes, cut into quarters

2 lb bone in pork roast

Cook the bacon in a skillet until crisp. Remove the bacon. Cook the onion and celery in the bacon grease until translucent. Add garlic and apple and cook until the apple is soft. Place the apple mixture in a medium bowl and add the bread and salt and pepper to taste. Add as much broth as needed to make the mixture soft and mix it all together well.

Grease an 8×12 pan. Place the sweet potatoes on the bottom. Make deep slits in the pork roast, between the bones. Place the roast on top of the potatoes. Stuff the roast in the slits. Pile remaining stuffing on top. Cover with foil and bake in a 375 degree oven for about 1 1/2 to 2 hours, until the meat is 145 degrees, removing foil after about an hour or an hour and 15 minutes, so everything can brown.

Did I get you with “apple and bacon?” Oh yeah. This was really yummy and it smelled so great while it was cooking! Apple and Bacon Stuffed Pork Roast 4 slices bacon, diced 1 small onion, diced 1 stalk celery, diced 1 garlic clove, chopped 1 apple, peeled, cored and diced salt and pepper 4 … Read more

no