turkey done1I went to Home Goods earlier this week (always a mistake). The Christmas decorations are out. October wasn’t even half over. The fall decorations have been shoved to the side and Santas and snowmen have taken over. I’ll admit I have no qualms buying Christmas decorations in October. In fact, if you want to get the good stuff, you’ve got to get to Home Goods NOW before it gets picked over, broken, and scratched. So I’m really ok with the appearance in stores.

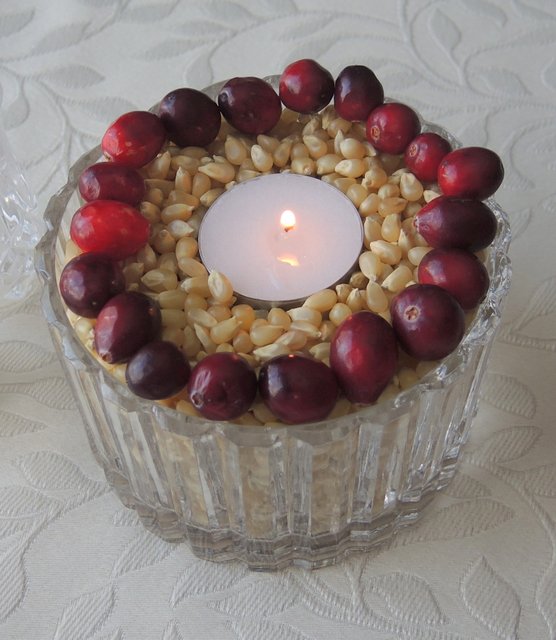
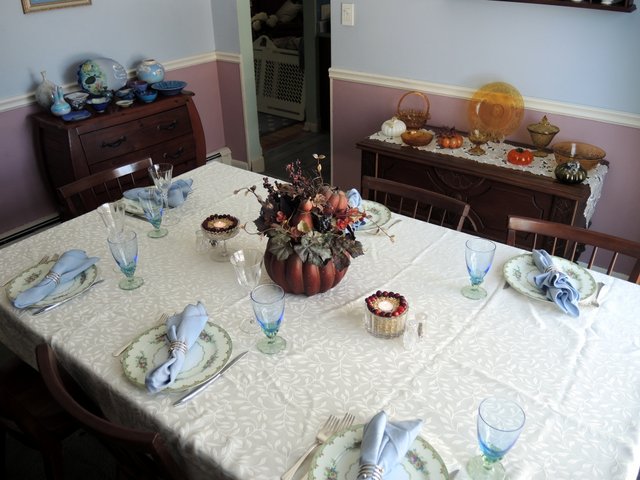
My problem is Thanksgiving. I like to decorate for Thanksgiving. To my husband’s chagrin, we have three types of storage boxes for fall decorations. Some are called fall and include pumpkins, leaf wreaths, nut wreaths, and gourds. These come out in September and stay out until after Thanksgiving. Some are called Halloween (jack o’lanterns, ghosts – you know the drill). These come out in September and are put away right after Halloween. Then there are some called Thanksgiving, which includes turkeys and cornucopias. They come out after Halloween and get put away after Thanksgiving. Thanksgiving decorations are hard to find, however. Home Goods has one little end cap with turkey plates. I am hungry for more! I just bought a little glass turkey candy dish at Michael’s for $4 so that made me happy, but the truth is Thanksgiving isn’t a a holiday most people seem to be decorating for. Since I host Thanksgiving, I like to have my home beautifully decorated for this holiday.

In addition to the lack of decorations, a big problem with Thanksgiving is that it comes too late. By the time Thanksgiving arrives, everyone is focused on Christmas and some people even have their homes decorated for Christmas by Thanksgiving. If Thanksgiving were a couple of weeks earlier it would still feel like it is part of fall. Right now it is merely the kickoff to Christmas.


I went to Home Goods earlier this week (always a mistake). The Christmas decorations are out. October wasn’t even half over. The fall decorations have been shoved to the side and Santas and snowmen have taken over. I’ll admit I have no qualms buying Christmas decorations in October. In fact, if you want to get … Read more

CornCranberryCenterpiece2I got a little creative yesterday and made these super simple Thanksgiving candle centerpieces. It is just popcorn and cranberries and a small votive. Next time I will try to find some colored popcorn (they sell red and black) to mix in for more color. Very easy to make and you can still use the popcorn afterwards!ThanksgivingTable3ThanksgivingCenterpiece

I got a little creative yesterday and made these super simple Thanksgiving candle centerpieces. It is just popcorn and cranberries and a small votive. Next time I will try to find some colored popcorn (they sell red and black) to mix in for more color. Very easy to make and you can still use the … Read more

We first enjoyed sweet potato muffins when we were in Colonial Williamsburg, where we stopped for a weekend before we headed to Hilton Head for a family vacation several years ago. We had a great time, except for how dang hot it was. I ended up buying a giant straw hat just to stop the sun from burning my face, shoulders and neck (even with sunscreen on). My husband bought a refillable mug and kept getting it reloaded with root beer to stay cool.

We love living history museums and this was a great one, except there was a LOT of walking, which is not so much fun with kids in the heat. We spent two days here and saw a witch trial, took a ghost tour, explored the governor’s palace and visited many working period shops in the “town” and petted some farm animals. My daughter declared that Patrick Henry was her hottie after passing him on the street where he was proclaiming “give me liberty or give me death.”. She came home with a tricorn hat to remember the experience.

We stayed at the Williamsburg Woodlands hotel in a nice little two room suite, which was like a lovely little Poconos-type resort with a game room, a mini golf course in the woods, and lots of green space. One night we dined at Christiana Campbell’s Tavern, a tavern George Washington often visited. This is where we had the muffins, and all of us enjoyed them immensely. After we came home, I hunted down a recipe and found it online somewhere (the tavern used to hand out the recipe to diners).  I do this a lot when we travel – enjoy something and come home to learn how to make it myself.

I have tweaked the recipe a bit over the years and it remains a family favorite, perfect for fall, and for Thanksgiving! Serve with honey butter.

1 cup whole wheat pastry flour

1 teaspoon baking powder

1/2 teaspoon salt

1 teaspoon cinnamon

1/2 teaspoon nutmeg

1/2 stick of butter, softened

1/2 cup sugar

2 eggs

1 cup cooked mashed sweet potatoes/yams (about one yam)

1/2 cup skim milk

optional: 1/2 cup chopped pecans

Preheat oven to 400 degrees and spray 12 regular size muffin tins with cooking spray (I use silicone tins). Beat the butter and sugar until fluffy. Add in eggs, yam, and milk and mix completely. Add flour, baking powder, salt, and spices and mix until completely combined. If  using pecans, stir them in. Divide among muffin tins and bake for 20-25 minutes until a cake tester comes out clean.

Honey Butter

Mix 1 tablespoon honey with 4 tablespoons butter in a food processor. You can also use maple syrup instead of honey.

We first enjoyed sweet potato muffins when we were in Colonial Williamsburg, where we stopped for a weekend before we headed to Hilton Head for a family vacation several years ago. We had a great time, except for how dang hot it was. I ended up buying a giant straw hat just to stop the … Read more

Yes, really, Thanksgiving with no mess! I love Thanksgiving, but if you’re cooking for one or two or three, well, who wants to have a giant roaster to scrub? For those of you looking for all the flavors of traditional turkey, stuffing, and gravy, but who don’t want to spend the day in the kitchen, I’m happy to share this recipe with you. Mr. NoPot suggested we skip making a whole turkey and just do this, he loved it so much.

2 celery stalks
1 small onion
2 tbsp butter
4 slices whole wheat bread
4 tsp chicken broth
sage, rosemary, and salt and pepper
4 turkey cutlets
8 tbsp of turkey gravy, plus more for serving

You’re going to be bowled over by this method. Start with a 2 cup Pyrex measuring cup. If you don’t have that, then just get a microwave safe bowl. I love the Pyrex because it has a handle, which makes it easy to get in and out of the microwave. Chop your celery and onions (you can use a mini food processor if you like, or do it by hand). Place them in the Pyrex. Add the butter. Microwave on high for 4 minutes, stopping every minute or so to stir. By the end, you will have vegetables that are soft and starting to brown.

Create 4 individual packets. In each one place a slice of whole wheat bread. Sandwich bread works perfectly, or you could use a loaf of whatever you have hanging around. Spread 1/4 of the vegetable mix on each slice of bread. Spoon 1 tsp of chicken broth on top of each. Place a pinch of sage and a pinch of rosemary on each and lightly salt and pepper them. Lay a turkey cutlet on top of each. Spoon 2 tbsp of gravy over each one (you can use gravy from a jar or a can, or if you’re like my mom, you have homemade gravy in the freezer, ready for any gravy emergency!). Place a pinch of sage, a pinch of rosemary and light amounts of salt and pepper on top.

Fold the packets up and bake at 400 degrees for 20 minutes (or until a thermometer poked through the parchment into the meat reads 165 degrees). Take them out of the oven and allow them to rest for 5 minutes, then serve with extra gravy on the side (warmed in the microwave – use that Pyrex again, no need to wash it first) and some cranberry sauce. Then be thankful you don’t have much to wash to clean up!

P.S. I know the turkey looks absolutely pink in this photo. It wasn’t until I tried to adjust it, then I couldn’t get rid of it. Anyway, please know it did not appear this color when we ate it and it was completely done!

Yes, really, Thanksgiving with no mess! I love Thanksgiving, but if you’re cooking for one or two or three, well, who wants to have a giant roaster to scrub? For those of you looking for all the flavors of traditional turkey, stuffing, and gravy, but who don’t want to spend the day in the kitchen, … Read more

Thanks to Karen at Karen and Charlie’s Kitchen for choosing this week’s pick-your-own project  – Thanksgiving tablescapes. I liked the one where you make a small pumpkin into a candleholder, so I did a trial run with that, which looks sort of lame since it’s crooked. I guess you need a straighter pumpkin to get it to work! I just hacked away at it with a knife to make the hole, then pushed the candle in. I like this idea a lot, even if mine wasn’t the greatest in execution!

Here’s a photo of a centerpiece I bought a few years ago (I think I got it at the grocery store to be honest!) and which I really still love a lot.

Thanks to Karen at Karen and Charlie’s Kitchen for choosing this week’s pick-your-own project  – Thanksgiving tablescapes. I liked the one where you make a small pumpkin into a candleholder, so I did a trial run with that, which looks sort of lame since it’s crooked. I guess you need a straighter pumpkin to get … Read more

This year I bought one of Martha Stewart’s turkeys. Martha seems to be slowly making her way into the food market, so I was interested to try her turkeys. Martha’s turkeys are described as organic (although not certified), pasture fed and humanely treated – three things that are important to me. Last year I bought an organic turkey at my supermarket, but it was not pasture fed nor humanely treated, so I jumped at the chance to buy one of Martha’s. The cost made me choke a bit. I paid $85.51 (including shipping and AFTER a $15 discount) for a 12 lb turkey. That is quite steep.

The turkey arrived frozen on the day scheduled. I left it in the fridge to defrost. This took much longer than Martha said it would. I got the turkey exactly one week before Thanksgiving and it was not fully defrosted until the day before.

I did a wet brine this year (last year I tried Martha’s dry brine). I used 1 cup brown sugar, 1 cup salt, 2 oranges quartered, 2 lemons quartered, fresh thyme and rosemary and about 6 peppercorns. I added this to 2 gallons of water and brought it to a boil and then cooled it before adding the turkey. I ended up adding about another gallon of water to get the turkey completely covered. I let it brine for about 16 hours.

When we took the turkey out of the brine to get it ready for the oven, we realized it was missing part of a wing! Martha would NOT approve of this.

I decided to attempt Martha’s cheesecloth method of turkey roasting (which was described in the instructions included with the turkey). You soak a piece of cheesecloth in butter (Martha says to use wine also but I didn’t use wine). You rub the turkey with butter and salt and pepper it (I also added some fresh sage, rosemary and thyme). Then you lay the cheesecloth over the turkey and bake at 425 for 30 minutes. Then brush it with the butter and reduce heat to 350, brushing with butter every 30 minutes for 2 hours.

After two hours, you remove the cheesecloth, baste with pan juices and continue to cook until the turkey reaches 165 (Martha says about 1 to 1 and a half hours). Ours was done in about an hour.

I did stuff my turkey- regular stuffing in one end and cornbread in the other end. We got a little excited after we took the turkey out and it rested – we didn’t remember to take a photo until after we scooped out the stuffing.

This was absolutely the BEST turkey we’ve ever had. It was moist, tender, flavorful, and it just about melted in your mouth. I am sure the quality of the turkey itself played a large part in that, but I also think the brining and the cheesecloth added to the taste and texture. I will definitely use this method again next year. I would love to buy Martha’s turkey again next year, but I hope I can find a local organic turkey that is pasture fed and humanely treated instead (not to mention less expensive – the shipping alone on this was $30). If not, I might end up with Martha’s again.

One other tidbit – I bought a potato masher – one of those handheld thingies you smush the potatoes with (highly recommended by Martha) and tried that for the mashed potatoes. I was surprised at how quickly they did smash up with it. However, I did not like the texture. It was too grainy. So I quickly got out the mixer and whizzed it with that – then it had the creamy texture we like. So the potato masher was a failure!

Bookmark and Share

This year I bought one of Martha Stewart’s turkeys. Martha seems to be slowly making her way into the food market, so I was interested to try her turkeys. Martha’s turkeys are described as organic (although not certified), pasture fed and humanely treated – three things that are important to me. Last year I bought … Read more

Turkey Redux

Posted by Brette in Food

We have a lot of leftovers from our turkey. The day after Thanksgiving, we usually have turkey sandwiches for lunch. For dinner, I reheat the entire Thanksgiving meal. To reheat the turkey, I put some gravy in a pan and heat that, then add in some slices of turkey for just a few minutes until it is hot. That way the turkey doesn’t overcook and stays moist.

By the Saturday after Thanksgiving I am starting to tire of turkey. So I really appreciated the section in the November Living with all the great leftover idea. My first try was turkey croquettes (page 70).

Croquette mixture

Croquette mixture

The recipe seemed pretty easy. You cook onion in a pan with oil then add thyme and sage. Next you add some chopped turkey and a little cream and cook until the cream is gone. You transfer it to a bowl and let it cool. Then add mashed potatoes, flour and egg. Mix it up and make little croquettes. Here’s where it got tricky. These croquettes were very, very mushy. Martha says to dip them in breadcrumbs, put them on a tray and freeze them for 15 min (a lot of Martha’s recipes

Ready to freeze

Ready to freeze

require a freezing step, I am finding). It was very hard to cover the mushy blobs in breadcrumbs and hard to transfer them to a tray. I muttered a bit at Martha under my breath. I think it might make sense to freeze the mixture for a few minutes first, then shape them into croquettes. They were really hard to work with.

After I froze the breaded croquettes, them it was time to fry. The key here is make sure your oil is very hot. The first batch I did broke apart a little and didn’t cook

Fry it up in a pan

Fry it up in a pan

very evenly, but the second batch was perfect.

You serve them with cranberry sauce. They were tasty with a nice flavor. What was weird was you couldn’t really tell you were eating potato at all. They definitely need the cranberry sauce, so don’t leave that out. I would definitely make these

Fried to perfection

Fried to perfection

again next year. They’re a nice alternative to other turkey leftover dishes I think. A good thing.

We have a lot of leftovers from our turkey. The day after Thanksgiving, we usually have turkey sandwiches for lunch. For dinner, I reheat the entire Thanksgiving meal. To reheat the turkey, I put some gravy in a pan and heat that, then add in some slices of turkey for just a few minutes until … Read more

Turkey Talk

Posted by Brette in Food

As I posted earlier, this year I made Martha’s dry brined turkey. In the past I’ve done a wet brine and been very happy with it. I took the plunge though and put my turkey in Martha’s hands.

Ready for the oven

Ready for the oven

The dry brine meant I coated the turkey with a mix of salt and bay leaves and left it in the fridge for 48 hours. Thanksgiving Day, Mr. Turkey came out and we first rinsed it well inside and out. I was a little paranoid about so much salt, so I really wanted to give it a good rinse. Martha says to pat the turkey dry and then rub it with half a stick of butter. I’ve never rubbed a turkey with butter, but if Martha says so I will obey. I also sprinkled some poultry seasoning and salt and pepper on it.

I stuffed the big cavity with regular stuffing. I admit I did not do a Martha stuffing since my kids would mutiny. Here’s how I make stuffing. All year long I keep a bag in the freezer and throw stale bread and the ends of loaves into. Come Thanksgiving, I have a nice variety of different breads and plenty to make stuffing with. I cook up onions and celery and add that with poultry seasoning, thyme, rosemary, bay leaves, sage, salt and pepper to the stuffing. Then I get it wet with broth and water. Pretty easy.

The small cavity was stuffed with a new family tradition – cornbread stuffing. We tried this last year and it was a hit and everyone wanted it again. I make cornbread and treat it like I do the regular bread stuffing.

Once the turkey was stuffed, Martha says to tuck the wings underneath it. It took a while to figure out how to do this. What she really means it to take the tips of the wings – that third, skinny part – and bend it backwards and then stick it under the front of the turkey (the neck end). Next, I tied the legs together as directed by Martha. Into the oven it went. Martha says to baste it every half hour with a butter and white wine mixture. I just used butter (we’re not big on wine).

Martha says to start the oven at 425 then turn it down to 350 after half an hour. I did as directed.

Here’s where things got a little kooky. My turkey was 19 lbs and every chart I consulted said it should take 4 1/2 to 5 hours stuffed to cook. Ha! This bird was done in 3 1/2 hours! I was not prepared at all! I turned the oven down to warm and raced around peeling potatoes and cooking veggies.

Right out of the oven

Right out of the oven

I let it rest outside the oven for about half an hour before Mr. MarthaAndMe carved. What a beautiful bird this recipe produced! It was a gorgeous bronze color, just like the one of the cover of the November issue of Living. I’ve never seen a turkey so brown and perfect.

This was hands down the most delicious turkey I have ever made. It tasted simply incredible. Moist, flavorful, silky – to die for. I did use a different kind of turkey this year – organic, free range when in the past I’ve only used organic, so that may be part of it. But I believe the dry brine definitely made this turkey moist and tasty. Slathering it with

Ready to carve

Ready to carve

butter probably helped too.

What else did we have? Mashed potatoes, gravy (pan drippings mixed with turkey broth that I mix Wondra into), and roasted root vegetables (carrot, parsnip and rutabaga with olive oil and balsamic vinegar). Pumpkin pie for dessert (that’ll be tomorrow’s post, so tune in to find out how Martha’s pie went).

We had a great Thanksgiving. We watched the parade and the dog show. After dinner we played some games and then watched the Charlie Brown Thanksgiving show. It was a terrific, relaxing day. We have lots of leftovers – Oh! I can’t wait to have that turkey sandwich at lunch! I’m also planning to try out some of Martha’s leftover ideas from November Living.

I will definitely make this dry brined turkey again next year. It is much easier to make than the wet brine and the results were simply incredible!

As I posted earlier, this year I made Martha’s dry brined turkey. In the past I’ve done a wet brine and been very happy with it. I took the plunge though and put my turkey in Martha’s hands. The dry brine meant I coated the turkey with a mix of salt and bay leaves and … Read more

For the past few years, I have done a wet brine for my Thanksgiving turkey. My brine usually includes salt (obv, as my teen would say), cider, sugar, lemon juice, lemon slices, orange slices, and some Williams Sonoma Turkey Brine mix Mr. MarthaAndMe bought me for Christmas one year.  I’ve experimented with adding brown sugar or molasses. I’ve had great success with brining. It creates a moist and flavorful turkey. It’s well worth the effort. Martha said on her show Tuesday that this is the year of the brined turkey. She said in past years people were all excited about deep frying their turkeys, but this year everyone is brining. Look at me, riding the trend!

In the past, I bought a Plainville Farms organic turkey from a butcher shop. This year, however, I bought an organic, free range turkey from my grocery store. It was $64 for a 19 pound turkey! Yowza!

In the November issue of Living, Martha has a recipe for a Dry-Brined Turkey, which she and Sarah Carey demo’ed on the 5th Cooking School lesson on her show (which I missed, but was able to catch most of online). I had never heard of a dry brine before this, so this is a new one for me. The scientific explanation for it that somehow the salt draws all the juices of the turkey to the surface which makes it juicier. I’m not chemist, but I’ll give it a shot. Martha says you must dry brine your turkey on Tuesday if you want it on Thursday (it needs to sit for 48 hours), so that was the plan.

Mr. MarthaAndMe and the cavity

Mr. MarthaAndMe and the cavity

First step is to remove the giblets. Eww, gross. I hate those! Mr. MarthaAndMe was glad to step in and hold the turkey’s intimate parts for me. I love how Martha wears gloves to work with turkeys. I definitely could use those. One small glitch – this turkey had an actual feather still attached. Eeek! That did not make me happy! Mr. MarthaAndMe bravely plucked it out.

Next, you rinse the turkey off, inside and out. I understand the importance of this, but boy do I hate doing it. All I can do is imagine nasty turkey salmonella germs all

Patting Mr. Turkey Dry

Patting Mr. Turkey Dry

over my sink. Blech. (I know I do seem to have many issues when it comes to turkeys, don’t I?) There was some serious cleaning when this project was done I can tell you.

The next step is to pat the turkey dry. Ok, got that Martha.

Then you rub the turkey, inside and out, with a mix of salt and bay leaves. I really expected there to be more in the mixture than that, but I’m doing what Martha says. This was harder than it sounds. Since I patted Mr. Turkey dry, the salt and bay leaf stuff didn’t want to stick to him at all. I kept rubbing it on and it kept just rolling off.

Then you put the turkey-lurkey in a bag and get the air out and refrigerate until

Dry Brine

Dry Brine

Thanksgiving day. Martha says to use an oven bag. I cheated and used a giant size Ziploc. I got all the air out and tucked the zippy part underneath.

I’m a little nervous about this! I’m used to my wet brining approach, so I’m worried this won’t be as good. All I can do is trust in Martha. As always, I do enjoy trying something new, so I’m definitely game. I’ll report back after turkey day as to the results! I’m sure there are others of you out there trying this method too, so I’m interested to hear your results also.

Turkey massage

Turkey massage

Turkey in a bag

Turkey in a bag

For the past few years, I have done a wet brine for my Thanksgiving turkey. My brine usually includes salt (obv, as my teen would say), cider, sugar, lemon juice, lemon slices, orange slices, and some Williams Sonoma Turkey Brine mix Mr. MarthaAndMe bought me for Christmas one year.  I’ve experimented with adding brown sugar … Read more

I signed up for Martha’s Thanksgiving Workshop email program. The idea is she will send me an email once a week to help me get ready for Thanksgiving. Ok, that’s clever, although I am not really feeling overwhelmed about Thanksgiving. Unlike Christmas, it’s just a dinner.

Week 1

The first email arrived the first week in November. She suggested that I:

– Choose a menu. This was easy since we tend to be traditional. I’m going with her classic menu.

– Create a guest list. Easy – it’s just the 4 of us. No guests.

– Order the turkey. I’m going to call the butcher today. I always get a fresh turkey.

– Create some decorations. Martha has big ideas about buying a cornucopia and then wrapping it in burlap and raffia. Sounds nuts to me. I have two that I filled with artificial fruits and vegetables and I think they are great. The one in my living room is crystal and has some gilded things in it. The family one is more casual. She also wants me to fill an urn with fresh produce for my porch. Instead, I have an arrangement of artificial flowers and pumpkins on my porch which will last longer than Martha’s. Do you see our “purkey”? Or “tumpkin”? We have these metal turkey pieces you insert into a pumpkin and it makes this cute turkey.

These are the kinds of things where Martha has great ideas, but I don’t know how anyone can have the time and money to do them all. Instead, I’m taking my inspiration from her and doing things in a less expensive and less over the top manner.

Family room cornucopia

Family room cornucopia

Living room cornucopia

Living room cornucopia

Front porch

Front porch

Week 2

Update on week 1 responsibilities:

– I tried to order my turkey, I really did. My grocery store had a page in their ad showing that they have organic free range turkeys. Perfect, I thought! I went to the counter to order it and they told me they don’t take orders! They told me when they get deliveries and suggested I come in on those days! I could also call them and ask them to pull one out and hold it for me. Gee, how convenient.

– I took the quiz What Thanksgiving Side Dish Are You? Martha says I am mashed potatoes and gravy, which is totally accurate! I love mashies so, so, so much. It is a childhood deprivation issue (I’m throwing my mom under the bus again!). My mom usually had Thanksgiving when I was a kid and she doesn’t like mashed potatoes (which is why I can’t get enough of them). In fact, she doesn’t like much about a traditional Thanksgiving. We never had pumpkin pie either (although I believe there was pumpkin soup) and there were various frightening stuffing experiments that still give me the chills! I’ve never once seen a green bean casserole and she always made her own cranberry sauce with fresh cranberries and oranges.

– I have a table-setting ready to go (I’ll be posting photos soon)

– I am supposed to practice my side dishes. Well I made Big Martha’s mashed potatoes and the acorn squash with rosemary from the Nov. issue of Living this week, so that counts

– I am also supposed to bone up on my basic cooking techniques. I think I’m good with that, Martha. I’ve cooked many a Thanksgiving meal and I’m also following along with cooking school, so I think all is well.

Here’s a side note. I’m two weeks into the Thanksgiving workshop and I just got an email from Martha about the Christmas workshop. OMG. I haven’t even finished the table-settings for Thanksgiving. I just about died when I followed the link in the email. There is a TEN PAGE shopping list. 10 pages!!! I have never seen anything like this in my life! Now, I am sort of excited about it because Christmas does bring out my inner crafter, however this is way over the top. I’m SO scared. I’m going to have to attempt at least some of these crafts. Michaels just sent me a 50% any item coupon, so I guess I’ll put that to good use!

I signed up for Martha’s Thanksgiving Workshop email program. The idea is she will send me an email once a week to help me get ready for Thanksgiving. Ok, that’s clever, although I am not really feeling overwhelmed about Thanksgiving. Unlike Christmas, it’s just a dinner. Week 1 The first email arrived the first week … Read more

no